Tuesday, April 14, 2026

A Book Review


If you have been sewing for a while you probably have a stash of favorite books you use to refer sometimes for a sewing project. Sarge recently brought two of hers from Sandra Betzina to the sewing retreat last month to share with me. Today, I’d like to share a book by Marta Alto, Susan Neal, and Pati Palmer named Jackets for Real People, which is a Palmer/Pletsch Publication. Those of us lucky enough to have this know what a treasure it is. You may be familiar with these instructors for their fitting process using the pattern and a little tape, in this review, I will refer to it as ‘PP’. You cut out the pattern, add tape near the seam allowance to hold the pins in, pin it then while wearing the paper discover, and make the necessary fitting alterations. I have used this method with some level of success, and most recently opened up a tried and true dress pattern that I used this method on, and thought I could make a few additional alterations. That is my latest project. Meanwhile I have interest in making another blazer so I plucked this book off my shelf. In flipping through, I am again reminded of the wonderful resource the book is. Even though this book is targeting jackets, you don’t need to be familiar with the PP method, because it gives the reader all the information you need to do the fitting. What I particularly like about the fitting section is that it gives real examples with pictures and information on how each was altered with a final picture of the result! Additionally, it gives construction information too! Need to know how to do a welt pocket, with 5 pages of instruction on just that with some diagrams, I am pretty confident I could do this. They also give tips on how to make sure the welts and pockets are aligned, and what to do if your dart intersects with the welts. Information is also plentiful on how to handle lining and even how to make a lining pattern if your pattern was lacking. My favorite though, is the interfacing diagrams, they let me know, which type of interfacing goes on each piece of a jacket pattern and where. For my next blazer, I wanted to try a new technique of using tape on the roll line. My last blazer (see show and tell 2025) was chosen without a lapel for that very reason, I was looking to avoid the roll line. Well that, and I’d be wearing it in the summer. You see, I have an unfinished blazer made with the most itchy of wools that I was gifted some time ago, I thought I’d use it to make a wearable muslin (maybe!). With the alterations I made, I needed to check the fit, so I decided I’d use that fabric. I used multiple colors for the lining because I was using what I had. I didn’t really like the way the lapels laid down, and felt it needed topstitching all around it. I’d have to check to see if I did any understitching, I’m sure that should have fixed that problem. Since I sew, and have so many interests in sewing like quilting, crafting, bra making and other garments, I never seem to get to the perfect result I am looking for. That’s ok! I will keep trying, I will make mistakes, and I will forget how to attach the lining to the fashion sleeve hem. I will however, keep my book handy because it really does seem to have all the tricks (including that sleeve hem) I would need to have a wearable product. As for that itchy blazer, I am still looking to take it a bit apart to finish the front bottom inside facing to lining bit. Wish me sewing magic! 


Thank you for reading! 

Bonny


PS! There is a ASG event with Pati Palmer! Check out the ASG.org website for more information. 


Dreams on Paper and Palmer/Pletsch Tissue-Fitting Method Updated

Pati Palmer
Apr 24 | 10am-12pm

Saturday, April 19, 2025

A "fitting" pair of pants

 My son had asked for a pair of pants for Christmas using an old set of pants that he liked and that actual fit.  This pair was about 15 years old and unfortunately the store where we purchased them is closed.  We had tried many stores to buy new pants but most were dudes as they were not able to accommodate the width of his thighs.  Even shops that you think would carry American Men physique clothes such as Carhartt, Dicks, or REI fell short.  So with seam ripper in hand, pattern paper in the wings and selected fabric, the creating began.  Due to the fact that the previous pair were zip offs and contained a gusset in the crotch area, some redesigning was required to make just a straight pair of pants.  The gusset was kept but I extended it down (tapering as I went) the entire length of the leg.  My son chose gray camouflage knit fabric which helped in not having to match patterns but I decided to serge the fabric edges just to be neat.  For the most part the pants went together fairly well.  I had purchased some snaps for the front of the pants but couldn't figure out how to attach them until I realized I did not have the correct tool to do so.  The ones purchased had to be hammered in place, so a purchase of $7.00 for that tool was all that I needed.  He is happy with the pants and has plenty of room to move.

Needless to say he wants more!  

Sunday, April 6, 2025

 I was asked to expand on my repair of a priestly garment that appeared in the ASG Notions a few months back.  I have included the text submitted as well as more photos explaining or detailing my process.

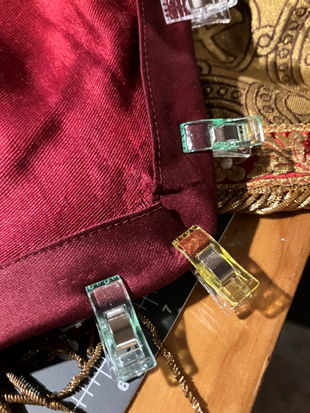
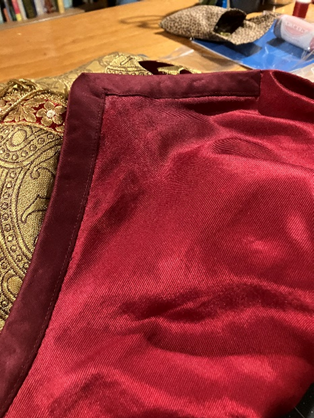
"I was asked by our priest to reattach a clasp to a cope.  However, when I received the garment all the wefts had disappeared in the area where the clasp was to go, and the surrounding material had little to no strength to secure the clasp.  Having the advantage of a textile conservator in the family (my daughter- Kayla Silvia Winokurzew) she presented me with two options for repair – recreating the weave by inserting new wefts or putting nylon netting (tuille) over the area and stitching around the area to give it more strength.  As this condition existed in the upper front portion of both sides of the garment and around the neckline area, I opted for the tuille and placed a self-constructed 1” bias tape to cover the tuille, so that the wearer would not be irritated by the slight roughness of the tuille.  The completion of this task involved a lot of hand sewing as there was no way that I was going to open the garment at the many seams that existed due to the fringe and other embellishments that adorned the garment.  As it was, I had to open the entire neckline and a good 6” on the front to attach the tuille and the bias tape.  Additional interfacing was also sown into the cope under the lining where the clasps were to be attached as there was previously only one thin layer of muslin.  The garment itself weighed a good 20 pounds so there was a lot of weight being carried by the two clasps.  While working on the garment, I used a lot of clips to ensure that the multiple layers of fabric stayed in place and was grateful for the #10 needles obtained from taking Helen Haughey’s Couture Hand Stitching Virtual class last year.  Although the final result may not be museum quality restoration, I am extremely happy with the outcome, and hope that the garment will last another 50 years for use in future religious services.  I considered this project both a challenge for technique and color compatibility, (oils from years of use had darkened the fabric around the front and neck from its original true red) as well as an opportunity to visibly mend a garment and further textile sustainability."

Other things to note, finding a compatible fabric was difficult, few exist that have do not have religious symbols such as crosses or paisley prints.  A complimentary color was also had to find.  The fabric chosen was a jacquard with a little bit of spandex, which was a benefit because I was using it on  the neckline and on the front of the garment.  

I hope this satisfies interested parties.  This did take a lot of hand sewing and lots of time to complete.


The original garment as received and a peak as to what was underneath.

Securing the layers while also applying the tuille.  Fray check was applied to the one very frayed area as an extra precaution.


The tuille in place.  The tuille is folded over about 3 times, so that the bias tape will have something of strength to hold on to.


The bias tape being positioned for attachment both on the underside of the lining and on the outside of the lining.  NOTE:  the additional tuille on the underside of the really frayed area.

The finished inside of the garment with the binding attached and the original label re-secured using misty fuse.


The finished outside of the garment with the binding visible and the clasp in place.


Sunday, March 9, 2025

Pattern choices

Do you AO? Or Projector? Or Old school printed pattern type of person? Spoiler alert, this is not a tutorial on how to do either of the first two, the third, as in a printed pattern, sure we have a lot of choices and we are all pretty familiar with that. Printed patterns are great for having all the pieces on very thin tissue paper, but at least you know what you are getting. Well, thin paper for most of the Big 4 that is. Smaller company pattern designers may be available only as a pdf where you need to print at home or at a print shop and tape together or they may already provide the pattern on A0 size, which is something like 33 by 46 inches. 


I have been wanting to get a new style, or at least try some new to me patterns. A few weeks ago, at Joanns I had made a few pattern purchases. Later, I went online to see what the bloggers were sewing and patterns they may suggest. I came across itch-to-stitch.com. There were some patterns there that I could see making and wearing! They have an option of this AO version to download then have a printing service print it for you, no more 8x11 pages to tape. You can do like I did, and download a free pattern, they have four to choose from, 3 tops and one skirt. I chose the Uvita Top. By using the free pattern, I figured since I don’t know much about the AO printing, if it didn’t work out, at least I didn’t spend too much. I first ‘purchased’ the free pattern then downloaded it to my phone. I saved it also in my DropBox incase I need to find it another day, but I see now it does save in my 'account' so I can access it there too. Then I went to theplottedpattern.com and chose A0 Sized Printed pattern on plain paper, it was $2.40, with shipping it came out under $8 because I had ordered a few envelopes for patterns, they were 15c each. If I didn’t do that, altogether the printing and the shipping would have been $6.54. It was a very easy process and I didn’t even use a computer, I did all of this right on my phone! I took a picture of what came in the package, and how I received it. The printing company says it is 20# weight paper, it feels pretty sturdy, even better than the printer paper I have been getting lately at the big box store. There are also other options, the most expensive at $4 is the Tissue paper option, and the other is the $3 Translucent paper option, all of these options come with color or black and white printing. One thing on this is there was no sewing instructions, I am not sure if I specifically left them off since I wasn’t sure how it would work. In the plotted pattern they have two main choices, “Pattern and Instruction printing” and Custom printing. I chose the first of these. The designer though gave me both the traditional pdf to print and tape that includes the instructions. For this top, I probably won’t need instructions, although they may come in handy to understand how much of a hem the pattern contained. It was a fun little experiment and I would definitely have a pattern printed this way in the future if I am presented with the option. I haven’t made the Uvita top yet, but I hope to soon. 


Projecting is also another option. This one is even more intimidating to me, but may be an option for those who do a lot of downloading, or sewing a lot of different patterns, or if you design your own patterns using software. There are many choices in projectors depending on how far the projector will sit relative to your cutting or tracing area. The projector saves the trees by projecting the pattern right on fabric for you to cut right there and then! Some drawbacks, you need a relatively dark room so you can see the projection, and there is a little bit of a learning curve. Next time you see me, let me know if you have gone to the projector dark side! 


For now, I may stick to paper patterns and maybe give A0 another try if there is a pattern that calls my name. 

For those of us who are looking for discounted patterns, simplicity.com does have sales. They had one this weekend, and I made a few purchases. Unfortunately, after I purchased, I realized I never checked my ‘buy’ list on my phone for those patterns I wanted and was going to look for at Joanns for their next sale. Anyways, I was able to purchase them at $4.99 and 2.99. the shipping wasn’t too bad either. Well, I am off to go sew! I have been sewing a few tops, and now want to do a few blazers, but then I also need pants, and some new bras, and, and, and! 


Posted by Bonny D on March 9, 2025: completely my own opinion and unbiased post. 

Sunday, February 16, 2025

Exhibit at the Albany Institute of History and Art

 I recently visited the exhibit "Enchanted Threads, The Art of Salley Mavor" at the Albany Institute of History and Art located in Albany, NY.  This exhibit has been extended to March 2, 2025.  It is worth the time and effort to view her fibre artistry.  Her work is done primarily with wool to make three dimensional images.  Some of the images and stand alone pieces include using natural materials such as acorns, stones and wood but are joined and embellished by hand stitching.  See some of her work in the attached photos.  She has illustrated a few children's books, but the images in the books do not do justice to her work.  Please take some time to visit this exceptional display. 

Cost is about $10 and parking is free in the back of the Institute.  Check the time and dates for viewing.

Stand alone display with antique glove and wee folk fairies

Close up of leaves with french knot embellishments

A representation of Sallye's life, each doll is equal to a year.

 A 3-D framed image of Halloween.

Tuesday, February 4, 2025

Shameless Plug


 Have you been on the https://www.asg.org lately? There is a delightful article on restoring vintage sewing machines. I particularly enjoyed reading this article. A year ago last November, I purchased a 1918 Red Eye Singer 66 treadle. It came to me needing a little love and attention, and I was able to get it sewing again! I am currently working on restoring the cabinet. I am not sure how I will fit this machine in my sewing room since it is already full of machines! Are you an old machine lover? Do tell!


Tuesday, January 9, 2024

Home and Arts Classes

 I am very excited to be asked to co-lead a sewing class hosted by the Saratoga County Agricultural Society with two other very accomplished seamstresses. Please spread the word! The target is young adults who have interest in sewing but not sure how to use a machine, or where to start. With the name "Beginners Sip and Sew!" it is sure to be a blast. There are some other very interesting classes, please check out the link: https://saratogacountyfair.ticketmambo.com/index.cfm?e=inner4&itemcategory=95343


Posted by Bonny D on January 9, 2024

Monday, May 15, 2023

President's Reflection on Recent Trip to DC


My husband and I had the pleasure of visiting our daughter, at the beginning of May, who is doing a Textile Conservation fellowship at the Smithsonian Steven F. Udvar-Hazy Center, also called the Hazy Center for short.  It is the Smithsonian National Air and Space Museum (NASM)'s annex at Washington Dulles International Airport in the Chantilly area of Fairfax County, Virginia. It holds numerous exhibits, including the Space Shuttle Discovery, the Enola Gay, and the Boeing 367-80, the main prototype for the popular Boeing 707 airliner.  Whereas the downtown NASM contains many smaller artifacts, the Hazy center contains huge artifacts unable to be displayed in the downtown facility.

Because she is doing a fellowship at the Hazy Center, we were able to have a behind the scene tour of the conservation lab and some items that are undergoing conservation treatments.  Unfortunately, we were unable to take any photos without having permission to post them.  Our daughter’s specialty is Textile conservation which entails preservation treatments of artifacts to stabilize or reverse adverse effects due to previous non-optimal storage or display techniques.  Her skill set to preserve an item can involve sewing a new cover, repackaging an item using archival materials that contain no acid or other harmful chemicals, analysis of artifacts using spectroscopy or FTIR equipment to determine composition, or application of special textiles that will not interact with the artifact and which can be painted to appear as if the artifact is in perfect condition. All treatments must be reversible and carefully documented so that they can be “undone” if at a future time current acceptable techniques are found to be unacceptable.  She has been involved in making a seat cover for the Spirit of St. Louis, stabilizing a cloth covered wooden propeller designed and built by Samuel Langley (a contemporary of the Wright Brothers) and researching, documenting, and preserving a section of a Civil War Air Balloon made from silk fabric used in women’s clothing but treated with some kind of coating.  The project she is most looking forward to is assisting with the stabilization and construction of a mannequin for a training spacesuit worn by Yuri Gagarin.

We spent well over four hours at the Hazy center and still could have spent more time.  There was so much to see and admire.  My favorite artifacts was those in the Space area, as a kid I dreamed I would be an astronaut.  Although that did not happen, I can admire the technological changes and look in awe at what those astronauts relied on.

We also got to visit the African American Museum due to extremely rainy weather while in the area.  Again another tour of 3 to 4 hours and not enough time to see all. 

 If you are ever in the DC area check out every and all museums (if possible) and realize there is someone behind the scenes making your visit and the display of artifacts the best that it can be.  They are preserving history for all of us.

 Happenings in and around the Capital Area

In the May 7, 2023 Life & Arts Section of the Sunday Gazette, there was an article about a current exhibit at the Albany Institute of History & Art.  The show is titled "It's a Wrap: 200 Years of Outerwear".  The exhibit includes Gilded Age evening wraps, Victorian capes, Shaker cloaks, smart men's and women's suits from the 1900's as well a 1980 Lake Placid Olympic outfit.  Mentioned specifically is a coat and gown made by African American dressmaker Anabel Heath who lived in Albany.

The exhibit also includes coats and hats made with exotic animal furs prior to the passage of the Endangered Species Act in 1973.

The exhibit is on view until August 6.  Hours of operation are 10 to 5 from Wednesday to Saturday, noon to 5 on Sunday.  Admission is $10 for adults, $8 for seniors.  More information can be found on the Institute's website at https://www.albanyinstitute.org.

 As many of you are aware the ASG National Conference for 2023 is being held in NYC from July 27th to July 31st at the Midtown Hilton Hotel in Manhattan.  Registration is still open and as far as I know rooms are still available as well.  Classes and instructors can be found on the website and the registration process occurs at this link https://www.asg.org/resources/conference/ and click on the registration check mark.

Unfortunately, due to the lack of interest or timing of departure we had few interested members to secure a bus.  If you are planning to attend your travel will have to be done by private vehicle or mass transit in and out of the city.

Sunday, January 22, 2023

January is a good time to sew!

 Weather is unpredictable, and I am sure our fabric stash will keep our machines busy no matter what the sky befalls. What are you sewing? Please drop a line and let us know!

Sunday, January 30, 2022


Hello Sewing and Fibre Arts Enthusiasts,

As we as a chapter and as a country continue to experience remote learning and interfacing, I wanted to take this time to mention a few sites and options I have come across from our sewing community suppliers, and other connected fields who are trying to satisfy a need during this challenging time.

Many of our local and national advertisers are doing Zoom or other on-line learning platforms.  So please check out any of the following websites to stay connected, learn something new and explore your creativity:

  • ·         ASG at www.asg.org.  There are fabulous educational videos as well as sewing and embroidery projects, past Notions and Blog postings and an eBook on Drafting a Sloper (for everything from tops to bottoms).  Don’t forget to check out the other perks from ASG memberships.
  • ·         The Quiltbug at www.quiltbug.com for various fundamental sewing or project-based classes.
  • ·         The Albany Sewing Machine Center at www.sewandvacny.com for both virtual and on-line classes.
  • ·         Sulky at www.sulky.com for classes and free project ideas.
  • ·         Pam Damour at www.pamdamour.com for accessories, webinars, etc.  Pam has also started a newsletter entitled The Woven Thread-Decorating Diva Newsletter
  • ·         Madam Sew at www.Madamsew.com for some free project ideas under their blog.
  • ·         www.Blog.fabrics-store.com to read their The Thread which contains wonderful articles detailing the history of embroidery, artists engaged in 3D fabric displays, etc. 

If you find others worth sharing, please let us know.  As this list is nowhere near inclusive.

Thursday, January 20, 2022

Jennifer Stern from J Stern Designs will be using her HAPPY PANTS pattern in a two-day workshop.

If you want to make a great fitting pair of fitted pants, join us!  This class is a unique combination of using body measurements and muslin fitting.  Students will have the opportunity to try on pant muslins to narrow down the best size to start with.  Then we’ll compare your body measurements to the pattern measurements to customize the length and shape of the crotch.  After the pattern pieces are adjusted, use them to sew your custom pants muslin.  We will use the muslin to fine-tune the fit of the pattern pieces.  Students leave class with a completed fit muslin and adjusted pattern pieces ready to sew with.

SATURDAY, MARCH 12 and SUNDAY, MARCH 13, 2022

10 AM – 4 PM

Baymont by Wyndham Hotel

20 Airport Park Blvd

Latham, NY  12110


*Member Registration fee:  $80

*Non-Member Registration fee:  $130

**Kit:  $45

CLASS SIZE IS LIMITED TO 20


Registration Deadline:  February 25, 2022

Please note! 

*You must be pre-registered to attend. Check your email for registration and payment mailing instructions or ask a member, neighborhood group member or CAB member.  

**Kit fee includes Pattern, Fit Workbook, Tracing paper and muslin. 


Attendees should bring sewing machine, basic sewing supplies, 18" ruler, scotch tape, colored pencils/markers, extension cord and power strip. 

Tuesday, January 19, 2021

President's Message


Greetings dear sewing ASG Albany members!

This year I am honored to serve as your president and work with our CAB. Not only that, I am very excited about our year ahead together as we find creative ways to be together as a whole and in our neighborhoods groups to share our varied passion of sewing. I invite you on this journey this year, which will again be in part, different than previous years because of the pandemic. That said, this invitation comes with the notion of change but I hope with an emphasis on “let’s have fun!”

Thank you, Sandy Ciani, for not only your leadership last year but also your friendship. Your help along with Kathy LaManna Friedman’s is readying me for this venture. And I thank you both. There are many plans in the making for this year. Neighborhood groups will be involved in planning a variety of events that will be accessible to you. I encourage you to take part in them as you are able (and I am going to say it again...have fun!!). In looking ahead, PLEASE save the date for our November 6th annual luncheon and meeting.

This past year, along with sewing other things I was able to make several quilts. Recently, my son Dan and his beautiful wife Carrie were gifted the “Teenage Mutant Ninja Turtle Quilt” featured in our December Newsletter. We delivered it (my husband Dave’s idea) in person to them in Charlotte NC (shortly after Christmas) as they had had their first child (Anderson) in early November. The look on their faces was well worth the trip!

While we were there my son said to me, “Mom why don’t you sell your quilts.” My response to him was that when I make a quilt it is a very personal and somewhat spiritual experience; this is difficult to put in words and you may (or not) understand this. When I make a quilt, it is made with love for the intended person (s). The colors, the pattern, the backing all tie into a message I want to convey to that person(s). So, no I don’t want to sell my quilts, when I make them, I want the experience to continue to be what it is from my hear to the receiver’s heart.

What about you and your sewing? Is there a story? Is there a message you want to convey? What kind of experience is it for you? As I said in my election statement message: I am interested in hearing about your sewing start. I have heard some and I continue to look forward to hearing more of them on our journey together this year! Please stay in touch and involved, and most of all stay well!

Kind regards, Stacey


Posted by Bonny D on January 19, 2021

Saturday, October 31, 2020

Election and Annual Meeting

It is that time of year again, the leaves are falling and we have to turn the heat on so it must mean it is time for the November Annual Meeting of the Albany Chapter American Sewing Guild! By now, you have received the Sew You Know Newsletter vol. 23, issue 5 that contains on page 5 the Ballot for the three elected positions of President-Running Candidate Stacey D, Secretary-Running Candidate Learay S, and Treasurer-Running Candidate and currently seated Shawn Palleschi. Please mark your ballots and return them to Pat H. by November 4. See below if you want to learn more about these wonderful volunteers! 


On Saturday, November 7 beginning at 11AM we will have a Zoom Meeting in place of our customary gathering. Things look a lot different this year, so unfortunately we cannot meet in person and share a meal together and ooh and ahh over our members lovely creations. In order to join, you will need the connection information, this will be sent in an email, please keep an eye out for it, you can contact me if you have any questions. Reminder, you don't need a computer to join this meeting, if you have a phone that connects to wifi or the internet, or a tablet or ipad, you can join in. 


Greetings fellow sewing enthusiasts. My name is Stacey D. I have been a sewing enthusiast since I was 13 years old and learned how to sew in my Home and Careers class. Ever since then, including my college days, my sewing machine has traveled with me. What’s your sewing start? Sewing, is one of my heartfelt passions, and I look forward to sharing it with you in the many ways our chapter has to offer. One of the aspects of sewing that I have learned over the years is how much more there is to learn about sewing and the skills of so many talent- ed sewers out there. “Sew,” about me! I am a retired career educator and my love of teaching and learning will help me share that passion with others. I am a proud member of the Albany Chapter where I currently serve as the Education Chair. I am also the Co- Leader (along with Carole Martin) of the newly formed Fonda Neighborhood Group. My goal in sewing, which is well articulated by our National ASG: is to ensure we are “advancing sewing as an art and life skill.” I look forward to the opportunity to sew and collaborate with you! 

Learay S - Sewing and creativity have been part of my entire life. Growing up my mother used to sew some of my clothes, but the special ones were always for my birthday on St. Patrick’s Day. I would also receive craft kits for Christmas and I was always encouraged to cre- ate something. I took sewing for the three years in junior high (yes it was called that) and made my mom a vest of turquoise with a gold lining. I was so proud of myself. For high school gradu- ation I received a Singer sewing machine, top of the line at the time. I have degrees in Mathematics and Physics, and Health Physics (think radiation protection). After getting married and having children, most of the things I sewed were curtains and Hallow- een costumes. It is amazing how ingenious you can get when they want something that’s not a pattern. I believe my educational background has only enhanced my creative background. My son and daughter both do some of their own sewing and craft work, so it is great to pass that creative side on to the next generation. When we moved to NY I met Nancy Kmen in Saratoga Springs. She recommended I join the ASG. I have been a mem- ber since about 1999. I learned a lot through the NG so when the Albany Chapter was looking to start another group, I figured it was my time to give back. I have been co-leader of the Latham neighborhood group with Juanita Brown for about 3 years. 

Hi, I'm Shawn P, I am running to be your treasurer. I am retired from the hospitality industry. I am a wife, and mother of three adult children, I have a cat and a dog, and I love to cook and sew. My mother taught me to sew while I was in grade school, and fell in love with it in middle school when I realized I could make my own clothes and not wear my sister's hand-me- downs. My children, niece and nephew have never worn store bought Halloween costumes, I love to be creative. I became an ASG member in 2019 and was immediately asked if I’d like to run for the Treasurer’s position, and then I recruited my sister-in-law to join the Chapter. I am looking forward to getting back to meetings and seeing everyone.

Tuesday, June 16, 2020

Breaking News!

Something REALLY fun is happening in the sewing community. If you ever wanted to learn how to sew bra's, now is your chance. If you ever wanted to learn special techniques in bra sewing, now is your chance. Want to learn from amazing teachers? Learn at your own pace? Check out the Great Bra Sewing Bee. It is four days of virtual sewing bra bliss!

Neither our Chapter or me personally have been or will be compensated for this post. 
by Bonny D 6/16/2020

Tuesday, March 17, 2020

NEIGHBORHOOD GROUP MEETINGS (in person and face to face) UP UNTIL APRIL 15, 2020 ARE CANCELLED UNTIL FURTHER NOTICE.

The Governor's 10 point plan has been extended.  

This may be the time to get creative to find ways to socialize. Have you heard of ZOOM? It is a free service that allows people to SEE each other and HEAR each other from the comfort of home using their own computer. Perhaps you can have a Zoom based Neighborhood group meeting? Contact your Neighborhood Group leader if you are interested.

Meanwhile, as we are home and our toilet paper supply is dwindling, now is the time to think about our good fortunes. And what better time is there to sew for others? How about some charity sewing? Perhaps a quilt for the shelters? Or face masks for a local organization (or for yourself) that wants them? Check out these sites for some ideas: Good Housekeeping, Sarahmaker.com, or CraftPassion.com. UPDATE: check this one out: https://www.youtube.com/watch?v=ZnVk12sFRkY, or this pattern, or this one by MarfyOr, now would be a good time to take out those long forgotten kits, dusty from the lack of sunshine to  keep yourself busy. I started up my Amy Butler, Campers kit I bought ages ago. My first block turned out pretty nice! Don't mind my lopsided un-cropped picture below.

Whatever you are doing, just stay healthy!
-Bonny

Friday, February 21, 2020

Have you seen the ASG.ORG page lately? Take a stroll over there and see information regarding the next ASG annual Conference in Texas! Everything is bigger and better there! Bigger embroidery machines? SURE!  ASG membership benefits will also give you fun opportunities to save BIG on items we know all ASG members are looking for. Traveling? Why there is also a Chapter Locator for you to check out the nearest group that meets-well practically everywhere in the USA. Need to learn a new sewing trick? ASG members that sign in can go straight to the ASG Online! Videos & Projects page to learn mitered corners, pattern alterations, other sewing techniques. Just Ask Ramona has tips on setting sleeves! The Sew Along Series works on a project together at your own pace. These are VIDEOs!! You can start and stop at the touch of your mouse. There is so much information here, expect to spend some time!  Enjoy these benefits, you pay for them with your membership!

Friday, July 12, 2019

Sewing for Love

 In my search for the perfect hat pattern to make head coverings for people who lose their hair during chemo therapy or just want to look extra pretty, I came across Rob Appell and his Man Sewing video tutorial on sewing a Scully Cap. This one is great for sensitive scalps because it doesn’t have raw seams inside, making it more comfortable. You can find the pattern here. 

I have some tips for you if you decide to give it a go. First, watch the video, it helps to find out how the pieces go together they are printed on multiple pages and you have to tape the little bits together, you can make a full hat with two fat quarters or half a yard (per video). I used the fat quarters because I had it on hand and wanted to use up my marinating stash! By the way, I used 1/4 inch seam, except for the narrow hem described below. I enjoyed making the two caps because it went together quickly and gave a really nice result. Plus, Rob Appell is a hoot and has a great personality. He has lots of other videos- check him out!

See if you can follow along with my pictures. Good luck!!

Arranging your pieces like this will give you a different center piece but the sides and band will be the same. This picture with the Side piece has the fabric folded in half, if your pieces don't fit, fold your fabric the other way. The Side, Band Center, Band End and a copy of the Band End because you need four total of that one will ALL fit, I promise.


This picture shows the center piece on a fold. Do you see that the fabric is folded so that the raw edges are to the middle? You need to cut this out twice-on the fold! This is a little tight on a fat quarter but I made it work out just fine.


This picture to the left is showing the second cutting of the Center piece.


This picture is showing how the band center is attached to the band end, a band end goes on each side of the band center. Sew the band center ends to the band center twice, on each band center main piece. You will then have a ridiculous looking arc looking piece. Go ahead and press your seams to set then go wild and press the seam allowance to one side.


These are my pieces getting ready to sew all the little bits all at once to stream line the process. Pinned together makes it go so fast at the machine.

Do this:
1. Make narrow hem by folding up 5/8 seam allowance then open it and fold raw edge in then press flat, top stitch this down the side piece where shown.
2. Stitch the band ends to center band as explained above.
3. Stitch the TWO darts on EACH center piece, then clip your dart close to stitching.


This picture demonstrates how the side is attached to the whole thing and notice the narrow hem marking. Notice also the ORANGE dot near the top on the side piece. This is to point out the top of the piece, it is easy to get turned around!


This is showing the orange dots, the parts here are the center and side (I accidentally had my printer on print both sides setting and had to reprint some pieces. This is why the wrong side of the pattern looks weird.


These are the center pieces with the darts sewn in.


 Baste the two sides to each side of the center piece. The Orange dot if marked on the fabric would be at the top of the picture with the rounder part of the side piece being attached right sides together to center piece.


Notice here that the raw little edge of the center piece is not flush with the narrow hem, this is on purpose. It should be off set by about 1/4 inch for the seam allowance.
 Like this in pattern parts.
 It will look like this once basted.


And this on the wrong side once basted.


 I like pins, but you can do it without if you are daring! Pin the centers right sides together with sides tucked in.
 This is the forehead side of the center pieces pinned together with the sides tucked in all nice and cosy, leave this open for turning.

Sew all around then clip. Now, this little corner was a beast and would not lay open nicely when I turned it out. I must be doing something wrong, so if you have a tip, I'd love to add it HERE. Thanks! Ok, so you see this other outside corner to the right is the one where we off set the narrow hem of the side, we want to make sure this is tucked in and not caught in the stitching as you go around. Trust me, it is going to be sweet!


This picture shows it all together with the opening at the bottom of the picture. Trim your corners and clip here and there and turn out give it a good press.


I see you spying my pretty flower fabric. I'm so excited to say I am wearing the top I made out of it right now!

 Ok, here you will lay one long band piece right side facing UP so that the round part comes around you as opposed to away from you, you know? Like an upside down very wide U. Figure out where the middle is and pin the middle of the band to the open end of the center, sandwiching it all together put the other band piece face DOWN on top with the center. Again, if you are brave, go without pins.


It looks like this all pinned up. You will then sew this allaround the band pieces with some parts only the band being stitched together.


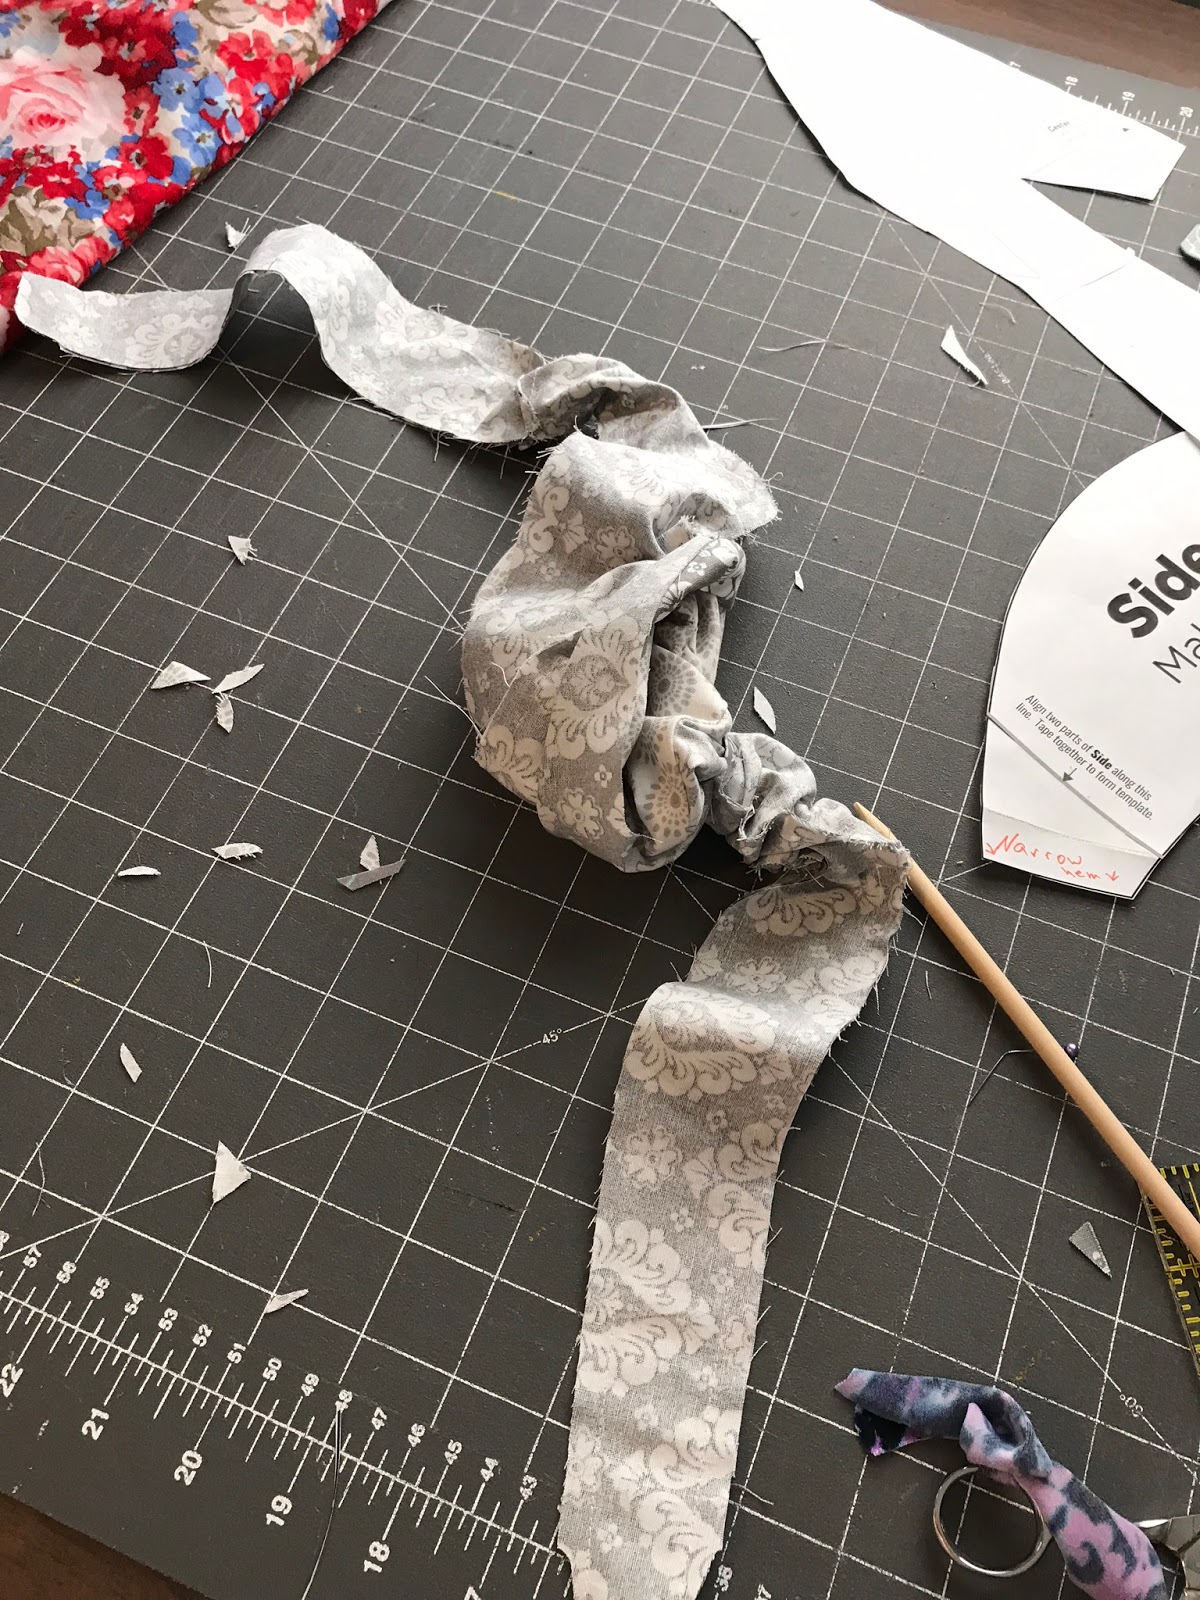
 It's going to get funky, but hang in there and sew it together as much as you can by fiddling the innerds in the band, it will turn out in a minute.
 This shows you how I sewed all around the band pieces and how it looks before turning out.
 After turning out you will need to close the opening that is left by giving it a good topstitch all around.

This picture shows you the nice little side end with the narrow hem and the end of the center piece. Looks good right!??


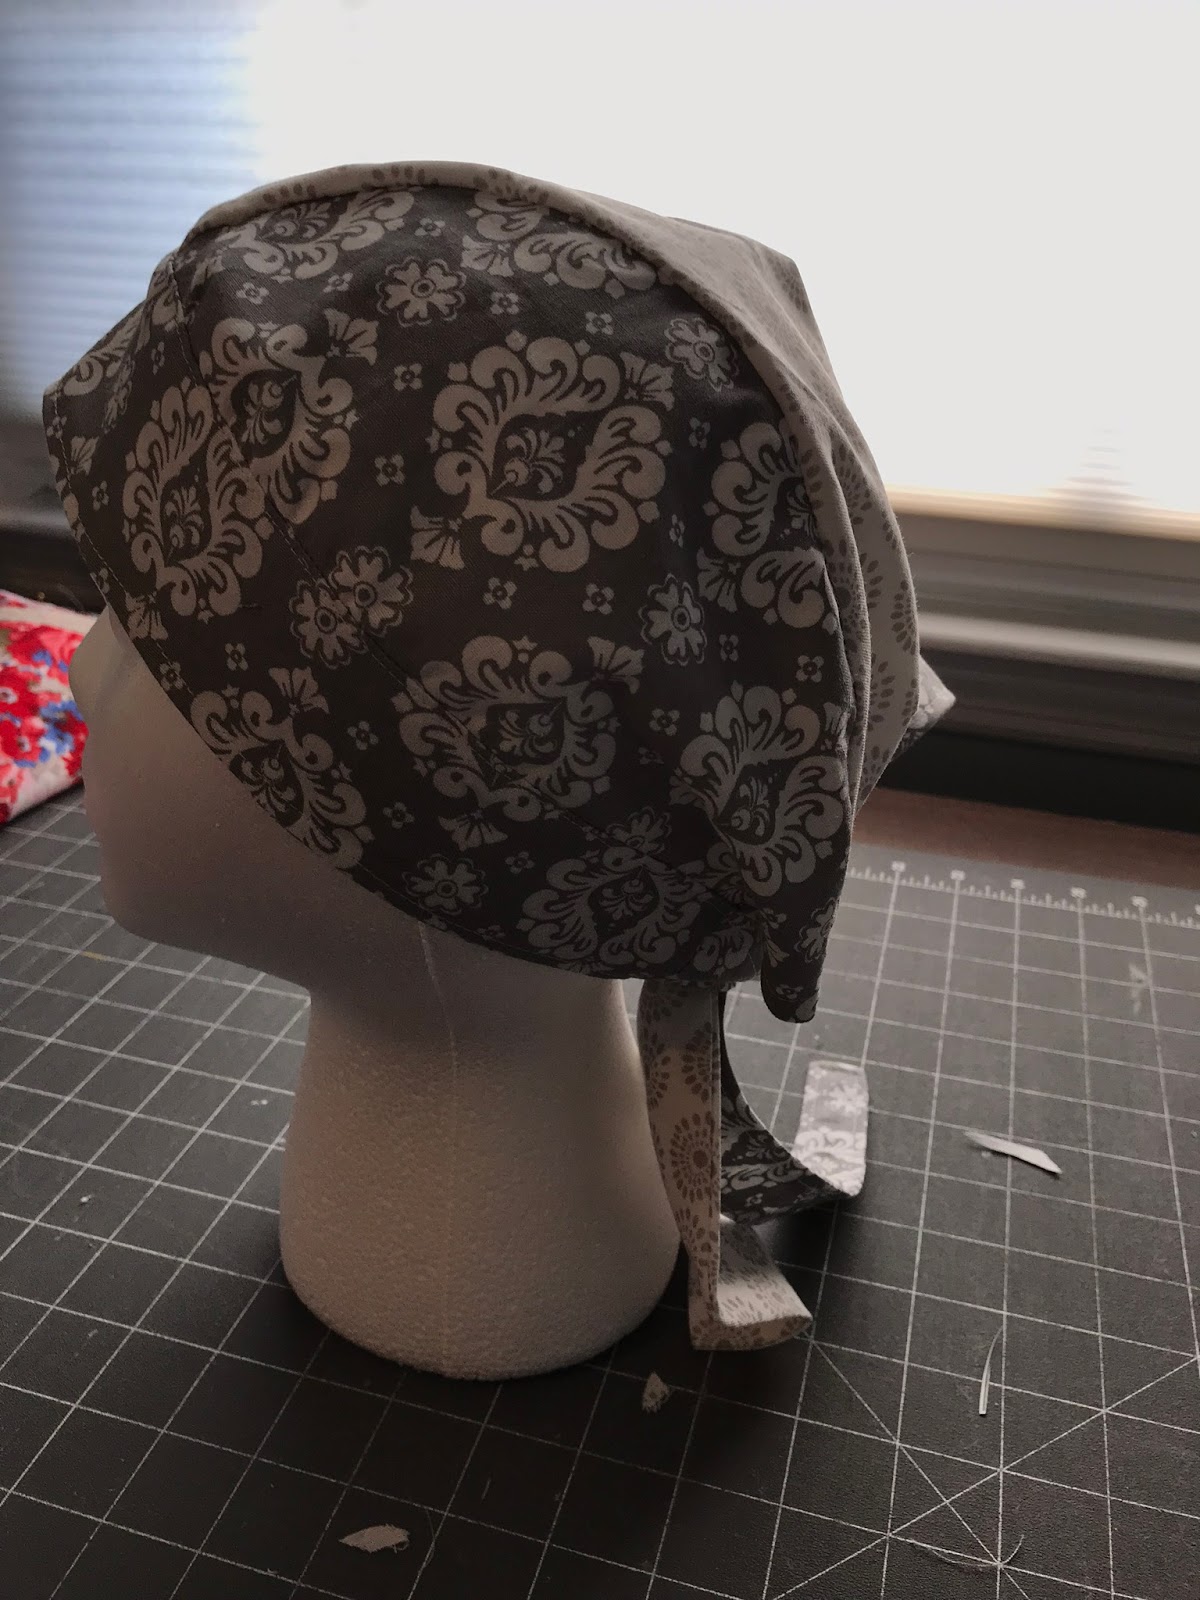
Finished!


Bonus! I get to use my styrofoam head that I bought for no reason.