A very interesting article on Claire McCardle, the American designer credited with creating the sportswear concept. Don't print, its long!
Also, I highly recommend CNN’s new series, American Style, which airs on Sunday. The first two episodes ran last Sunday, but CNN often re-airs at other times, so check your guide.
Submitted by Ann
-------------------------------------------------------------------------------------------------
Free Standing Lace Stabilizer Overview
by Diane
I prefer Aqua Mesh by OESD which is the very similar to Floriani’s Wet N Gone. This is a fibrous water soluble made for lace and stand-alone embroidery. The stabilizer washes out with hot water. After stitching the design, cut any excess stabilizer from around the design and place design in a bowl of warm water or hold it under running water. Wash out the stabilizer ONLY until it has disappeared from the empty spaces in the design. The design should be quite sticky and gummy. This is the dissolved stabilizer which when dry turns the design stiff as it acts as a starch. If making delicate embroideries, you may want to block the designs. Blot design between lint-free towels and block the design using a template if desired. Lay out to dry thoroughly. If designs are not stiff enough mix up some stabilizer scraps with a little bit of water and spritz, or using a small paint brush – brush it on. You can then embellish the design as desired.
Wash-Away Stabilizers:
AquaMesh by OSED
Wet N Gone by Floriani
Sulky Fabric Solvy by Sulky
Wash-Away by Hemmingworth
Sulky Solvy, Super Solvy, Ultra Solvy (clear, plastic like)
Badgemaster by OESD (also clear, plastic like)
The clear, plastic like stabilizers tend to perforate when stitching so they are not suggested for free standing lace designs.
I used Lindee G’s Winter Jewels Snow Flakes for the very delicate snowflakes that I made. [lindeegembroidery.com] Lindee also has quite a thorough set of directions for her Winter Jewel Mock Crochet Snow Flakes.
OESD designs Snowflake Elegance (# 12429) has a few beautiful and much larger snowflakes. [OESD.com]
Posted by Bonny D on January 21, 2019
________________________
Free Classes? Why yes, they are found at Craftsy!
How to get rid of that funky smell...ask a Clean Person!
Submitted by Ann, posted by Bonny D on July 16, 2018
__________________
Support your Chapter! Click on the Amazon Link on the right side of this blog before you select the item and place in your shopping cart. This does not charge you anything more, but does give a small commission to the Chapter that we use to benefit you!
__________________
Making RTW pockets bigger-oh yes you can!
My daughter insists that I make her pockets bigger to fit her phone. I am happy to oblige, shh, don't tell her! I secretly love the opportunity to do a very useful and easy sewing project. So, as you can see these jeans only have a 2 inch front pocket, no phone sold will fit this pocket.
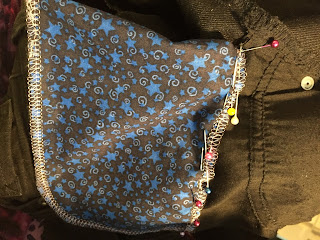
This is the inside of the front pocket, showing the short bag.I take some fun quilting cotton and serge the top edge, this edge will be used to attach to the current pocket bag. I have enough here for 2 pairs of front pockets for two pairs of jeans.
Then I serged the bottom and side edge as a folded pocket, the top is open.
I cut the bottom of the jean pocket bag.
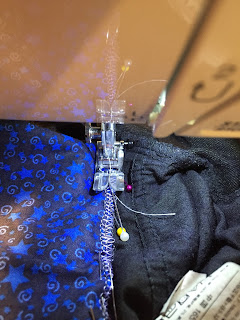
I pin the new pocket to the jeans cut open bottom pocket bag.
Yeah, it can be fiddly, this is the worst part-and it's not all that bad.
I zigzagged it because the jeans pocket bag that I cut could fray, and it makes a stronger seam.
The finished inside. Yeah, I could have used blue or black thread. Oh well. I didn't hear any complaints!
From a 2 inch pocket to 6 inches, neat! I must do a great job, because my daughter requires this treatment to all her short pocket pants. I wonder what the jean designers expect you to put in a 2 inch pocket? A used tissue?
Prepared, shared, and posted by Bonny D. on October 9, 2016.
___________________________________
Sue and Pat shared a couple links: this link to a video by my favorite teacher Sarah Veblen doing a tutorial on neckline binding with a knit!
and another ASG favorite Peggy Sagers takes us on a tutorial for welt pockets!
Scrubbies
Hi ladies. Here are the instructions for the scrubby's that I make. You need course netting, about 3 yards cut into 3 inch wide strips and a size H crochet hook.You can sew the strips together to make enough for your scrubby. Chain 4 and connect to make a circle. Chain 1 and then single crochet into circle [about 8 to 10 stitches]. In nest row you will do 2 single crochet in each stitch. Repeat until you have about 4 inches across. Single crochet around the circle. Next row is decrease. Single crochet in every other stitch. Stuff with netting when almost closed. Close and pull end of netting to inside of circle. Hope you have a lot of fun with this. I copied one of the ones that I bought in Florida to get the pattern. I love them as they do not scratch and they are great for stuck on food. Enjoy Regina W.
posted by Bonny D on April 14, 2015
____________________________
We recently discussed, at the GG meeting, the difficulty of knowing what works for our body types. I know a few people have asked about having a speaker, such as Nancy Nix Rice, come to our Chapter.
The link above is to Imogene Lamport's blog and website. I believe she's from Australia. She has lots of useful information with colorful illustrations and examples. This particular page refers to many pages of blogs on style, proportion, etc. It is a good place to start if you want to learn more. I liked the posts she did about prints. Who knew?
Happy browsing,
Ann
Posted by Bonny D October 4, 2014
_____________________________I like this blog. Check out the link for a genius technique to make bows so that they are all the same size - great if you are sewing for a little girl.....
Submitted by Ann S.
Posted by Bonny D.
March 29, 2014
-----------------------------------------------How to make furry scarves w/o mess?
Use the longest ruler you have, I had to add one. Have your vacuum ready with attachment. Vacuum right after rotary cutting, holding down fabric if necessary so it doesn't get sucked up. I made mine the length of fabric folded over, then cut at various widths, as small as 9 inches as wide as 16 inches. You make it as you like, remembering the width you cut here will be twice as wide as the finished scarf plus seam allowance. If I wanted a 6 inch wide scarf....6inch x2 = 12 Plus 2 inch seam allowance (1 inch each side)=14 inches wide to cut.
Flip it right sides together the length of it, pining well, this fabric likes to move!
all pinned and stacked on itself--because I have a lot of them!
My stitches on my Janome. Lengthen your stitch, its okay, really!
I didn't fuss too much with seam allowance, just make sure you are on the fabric! not the fluff.
This is showing how YOU MUST LEAVE A HOLE!!! I use double pins to remind me. The fabric crushes easily so you can leave a hand width hole and works great, leave it on one end or in the middle, either works.
This is me cutting corners...but it makes such a mess I think I gave up on it on the third scarf, unless my seam allowance was really large.
Turning out, reach in and grab and pull out.
Close up your hole! Use close to fur colored thread, you wont even know its there.
Wheres the hole????
One down, so many to go!
another hole to close.
My efforts all lined up!
I really enjoyed making these, I timed it after cutting about 15 minutes, cutting, say 5 minutes? Not too expensive either, if you get the fluff on sale...or with coupon!! Oh so soft it is my favorite winter accessory! Don't forget to give your sewing machine a good cleaning afterwards, especially the bobbin area.
Posted by Bonny D on Feb 3, 2014
__________________________
How To Make a Quilt Board by Bonny D
He tells me that the store (any big box like Lowes or Home Depot has this) will cut it for you- his meaning I could have brought it home myself. It was pretty large, but only 15 dollars if I remember correctly. It is a sheet of insulating foam board. Light enough for anyone to lift. After a couple days of using it with the whole length with just a piece of batting thrown over it, I decided I needed it to be cut into two pieces. I used a utility knife. Very easy. I covered the cut edge with some painters tape nearby, but ran out, so not the whole cut edges were covered...no biggie.
Next step lay down your cover on a flat surface, floor? Sure, go ahead. I pieced my batting for one of my boards, no biggie, it will still work. I used some really cheap batting, poly/cotton blend that I didn't want to use in a quilt. The internet search says you can also use the back of those super cheap tablecloths. I put the shiny aluminum looking side of the insulating foam board down on the batting and stapled the batting along the sides with staples about 6 inches apart and nothing fancy with the corners, just make sure they staples don't come out with extra layers, cutting the batting if necessary.
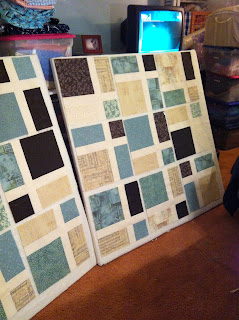
Here it is at work! The beauty of the quilt board is that you don't need pins to hold the fabric to the board. Like magic my 14 inch squares hold there by the batting. I could mount these to a wall if I had access to a wall! I think I will store it under a bed, or maybe behind the totes filled with marinating fabric.
Hope you enjoyed my post! If you have a technique to share please do! BonnyKDe@hotmailDOTcom is where I can be found!
Posted by Bonny D on November 21, 2013
_________________________________________________________________
posted by Bonny D 9/19/2013
_________________________
Bonny’s Right Hand Zip Fly Live Tutorial August 1, 2012
Bonny’s Right Hand Zip Fly Live Tutorial August 1, 2012
1. Prepare fly shield/underlap
a. Cut out fly shield
b. Interface
c. Right sides together sew lower end short curve, turn out
d. Edge finish long ends: serge, zigzag, pink, avoid sew and turn out due to extra bulk it would produce
e. Press, set aside
2. Prepare zip
a. Interface zip area left side
b. Baste center front with extension cut on (to get fancy stitch again ¼ “ away from cf- this keeps the zip from showing during normal wear* Trudy from Hot Patterns You Tube)
c. Continue to end of crotch curve with smaller/regular stitch
d. Edgestitch leftside fly if desired now to bottom of curve where topstitching will end.
3. Start sewing!
a. Wrong side up spread open
b. Trim right side extension only up to ¾ “ off
c. edge finish right side and separately left side and crotch seam (tog or separately as desired)
d. Hold fly extensions together and snip at curve to flatten, press
e. Fold pant front RST and put zip on top RS down OVER CF and baste or pin on trimmed right extension (put extra zip length pointing to waist)
f. Use zip foot and stitch zip on right side of extension only at 1/8” from zipper teeth, use backstitch
g. Press zipper edge back from front (seam just made), press
h. Attach fly shield
i. Finished edge of shield and trimmed right side extension pin together, with bottom curve of shield to crotch past curve of left side extension, folded edge to left side left free
ii. Pull unit back to face front while pinned from back pin front zip area to topstitch right side of zip (facing at your left now).
i. Attach left side zip
i. Place Front pants RST to your right out of way leaving left extension out
ii. Pin extension out of way
iii. Pin free left side zip to left extension
iv. Sew near teeth with zipper foot, back stitch
v. Stitch again 1/8” away
j. Topstitch left side on top, use template or freesew it at 1 ½” from CF, curving to CF while catching left side extension while shield is pinned out of way
k. Undo basting
l. Bar tack 3 layers: left extension, zip, and shield together ¼” long beginning of curve
m. Bar tack ½ inch above topstitching at bottom, horizontally about ¼” long for stress point
Pattern: Hot Patterns--Classic Nouveau 3 Graces T Shirts.
I used the sleeveless style cowl neck view. I really like the way the back of the neck comes up high, I don't like a low back or front neckline, it's not the best look on me, I wish the cowl neck version came with sleeves for the cooler weather so I took the sleeves from another view and just added them to the sleeveless style.
I bought 6 yards of a white knit fabric when it came on sale and use it for muslins when I test a new pattern for fit. Today I cut out a long formal dress using this pattern by extending the bottom of the T until it is floor length. Haven't sewed it yet so I don't know how the fit will be--planning on wearing it on a cruise in Nov. so I'm keeping my fingers crossed!
The draped cowl neck idea came from:
Pamela Erny's Sewing Style blog: http://off-the-cuff-style.blogspot.com/
Scroll down to "Pam's SEWING TUTORIALS", click on that and then scroll down again until you come to: 11/13/08 --Twisted "Draped Cowl" tutorial. Pam has great ideas and very clear instructions.
There is a fantastic Fly-zip tutorial video by Sandra Betzina that is FREE!
Check it out at http://www.threadsmagazine.com/item/3831/video-an-easy-flat-fly-front-zipper Sandra makes putting in this notorious headache causing zipper application look
amazingly simple and quick. The video is only 5.2 minutes long, and she sews the whole thing right in front of you.
How to replace a broken jean zipper without messing with the topstitching
By Bonny DeCastro
I started this journey when a co-worker of mine was telling me how she went shopping for a new pair of jeans because her zipper broke on her favorite pair. I offered her to fix them, with the understanding that I may not be successful. This is what I did, I waited, I pondered, I thought about it, waited some more, looked at the jeans, asked my ASG friends, waited a little more, then I went onto YouTube. There really is a wealth of information on the internet. I searched for “broken jean zipper” and found a 1 minute 50 second tutorial from QueenofDIY.com. This video sports over 5,000 views! I was inspired by the video and started my adventure soon after.
With a metal jean style zipper at the ready I did these steps. First I needed to cut out the old zipper. I started this by first taking my trusty seam ripper and removing the seam that held in the zipper tape on the inside of the right side (under the button hole-as it faces me). Then I took some very sharp small scissors and cut up the zipper on the other side, leaving all jean topstitching in place and untouched. I also had to cut the bottom of the zIp where it attaches to the fly. This is a picture of the old zip. Notice how the left side is narrow compared to the other, because that side was cut, not ripped out.


Next to do was to cut the new zipper to the proper length, using the old zipper as my guide. To do this I did just what the video showed, I lined the new and the old zips together pull to pull and marked the bottom of the new zip where the stop is on the old one. I cut about an inch or less under that line. I wide zigzagged in place the new stop where I marked, since I don’t have any fancy tools to move the new metal stop to the proper place.
This next picture shows how I machine stitched the left side (under the button). I used a zipper foot and took two passes to make it sturdy, one down, a little over, then up the other way. I folded the top of the zipper tape under.
Next I prepared for the other side by using pins that stabbed me several times…ouch! I pinned the right side of the zipper tape to other side of the jeans under the fancy fly topstitching. This area has two layers of denim that will hide my terrible hand stitching from being visible on the outside. This next picture shows from the inside the hand stitching:

The one mistake that I did was to flip the top of the zipper tape towards the front of the jean on this hand stitched side. I should have flipped it to the inside and stitched it down. Because I did that the zipper tape top is seen from the outside—well sort of, it is seen only if the fly is pulled away from the zipper on the outside. But, who is going to do that? You can see that in this picture.
The zip is more to the right than the old zip. It doesn’t matter because the fly will cover it.
The finished product completed in less than one hour! How cool is that!? Now my co-worker has her old pair of jeans back and she is very pleased with the results.


No comments:
Post a Comment